| Shortcut | Description |
|---|---|
| ALT + UP | Selects a document's previous page. |
| ALT + DOWN | Selects a document's next page. |
| CONTROL + G | Displays a specific page in a document. |
| Control + Z | *Will undo your last action. |
| Control + Y | *Will redo your last action. |
| Control + X | *Cuts the currently selected item. |
| Control + C | *Copies the currently selected item. |
| Control + V | *Pastes the last item that was copied or cut. |
| Control + A | *Selects all available items. |
| Control + + | Zooms in on the Display Pane. |
| Control + - | Zooms out on the Display Pane. |
| Control + i | Displays scanned images and no text. |
| control + t | Displays OCRed text and no images. |
| Control + alt + i | Splits the Display Pane. The top section displays an image. The bottom displays text. |
| Control + alt + T | Splits the Display Pane. The top section displays text. The bottom displays an image. |
| control + shift + i | Splits the Display Pane. The left section displays an image. The right section displays text. |
| control + shift + T | Splits the Display Pane. The left section displays text. The right displays an image. |
| Control + h | Enables/disables the Pan tool in the Display Pane. When enabled, drag in the direction you want to view. |
| Control + l | Rotates an image 270 degrees (left). |
| control + r | Rotates an image 90 degrees (right). |
| control + s | Start scanning a new document or into an existing document. |
| control + o | Stop scanning. |
| control + shift + e | Opens/closes the Error Log Pane. |
| F4 | Opens/closes the Document Properties Pane. |
| f3 | Opens/closes the Output Log Pane. |
| Control + shift + h | Toggles auto-hide for the active pane (if applicable). |
| Alt + F4 | Close Laserfiche Scanning. |
| TAB | Selects the next item in the Document Properties Pane |
| ENTER | Selects the next field in the Document Properties Pane |
*Only applies to text boxes.
Customizing Keyboard Shortcuts
You can add keyboard shortcuts for actions that do not already have them, or modify existing keyboard shortcuts.
Note: Keyboard shortcut customizations only affect the user who creates them and the machine on which they are created.
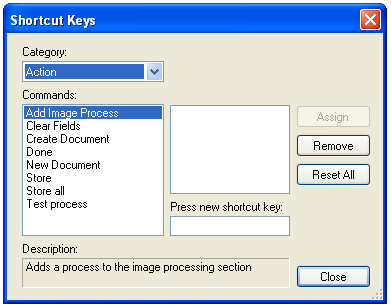
To assign a new shortcut to a command
- Select Customize Keyboard under File in the menu bar.
- Commands are organized into categories in the
 Shortcut Keys dialog box. Select a category from the drop-down box.
 - Select a command. Once selected, a description of the command will appear at the bottom of the dialog box.
- To assign the command a new shortcut, place your cursor in the text box under Press new shortcut key.
- Enter a shortcut key combination.
Example: Control+W, Control+Shift+Y, Control+Shift+Alt+O.
- Select Assign. If the command already has a shortcut, it will be replaced.
To remove a shortcut from a command
- Select a category from the drop-down box.
- Select a command.
- If the command has a shortcut assigned to it, click Remove.
To permanently remove all custom shortcuts you've created
- Click Reset All. This process cannot be undone.
